198x SS-150 rebuild

SHSU

Lieutenant Junior+Starmada Splash Of The Year 2019
Joined
Mar 8, 2017
Messages
1,758
Why not just make a seat box for the passenger side? Gives you a little storage and allows placement without stringer interference.

SHSU
 

Rasdiir

Petty Officer 2nd Class
Joined
Jul 18, 2011
Messages
169
Why not just make a seat box for the passenger side? Gives you a little storage and allows placement without stringer interference.

SHSU
If I can't find a seat that unfolds from both ends I think a box with two seats facing opposite will be my only option, I would just lose the unfolding capability.
 

SHSU

Lieutenant Junior+Starmada Splash Of The Year 2019
Joined
Mar 8, 2017
Messages
1,758
You don't want to do the jump seat box? Figured since you were going to do a pedestal, a single seat would work out.

SHSU
 

Rasdiir

Petty Officer 2nd Class
Joined
Jul 18, 2011
Messages
169
You don't want to do the jump seat box? Figured since you were going to do a pedestal, a single seat would work out.

SHSU
I still want to do a B2B seat that can go over the removable pedestal, I was hoping to find one that unfolds but if not then two regular seats placed B2B will work.

I finished sanding all the floor pieces and ordered and received the removable pedestal mount for the passenger side, I went with the Attwood 238. I spent a few days trying to figure out mounting locations for the future B2B seat and finally decided to just put the backing plates in the right places to accommodate a normal size B2B base (31.25x13.5" seemed to be standard). I will install 6 t-nuts in those plates and will just have to modify whatever seat base I eventually get to hit those locations (or build my own out of wood, then I can put the mounting locations right where the t-nuts are located). With that decision made I glued on the first layer of 1/2" backing plates.

My Shark Grey Nautolex and SS t-nuts arrived, and I was surprised to see a the colors had a brown tinge instead of the grey I expected. At first I thought they sent the wrong kind, but it appears I was victim of the low-res picture on their site, when I searched for a better picture the color is the same as I received. It's not too far off and will work fine, just not what I though was coming. Now that I have the t-nuts I will be drilling the bolt mounting holes tomorrow and installing the nuts, then gluing on the second backer plates over top, which will give me a full 1.5" thickness for all seat mounts. After that I will be sealing with OTF for the foreseeable future, 3 coats per side per floor piece and then another 3 coats of spar will take a while to apply.
 

Rasdiir

Petty Officer 2nd Class
Joined
Jul 18, 2011
Messages
169
Got the mounting holes drilled, t-nuts installed, second backer plates glued and screwed on, and 2 coats of OTF on. I messed up and forgot to install the t-nuts for the future B2B seat prior to gluing the second backer plates, so I installed them after and will screw on a small aluminum plate under each one to prevent them from falling out. I also forgot to drill the holes through the second backing plates, so they are solid under the t-nuts and I will have to use shorter bolts to keep from bottoming out. Not a big deal, just one more thing to adapt to.
 

Rasdiir

Petty Officer 2nd Class
Joined
Jul 18, 2011
Messages
169
After 48 hours the boards were just damp, so I figured that was enough OTF for the bottom. I flipped them all over and put on 2 coats of OTF on the top. Hopefully that will be enough for that side too and I can start with the straight spar varnish tomorrow. I need to pick up a few more paint tray liners and I can start rolling the primer on the consoles too, so I'll probably get that this weekend.
 

Rasdiir

Petty Officer 2nd Class
Joined
Jul 18, 2011
Messages
169
After most of a year away from this project the slowest Starcraft resto ever attempted is back underway! I did manage to complete the floor last Sep before I packed up for winter (more on floor below), but spring this year was horribly cold and wet, and also I was busy getting ready for my wedding that happened in the end of June, so I am only getting back to it this week. I will also be going on a trip later this month back home to visit family, so there won’t be a lot of progress until August.

Last Sep:

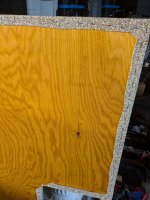
Here are pictures of the floor pieces with backing plates, OTF, and spar process. If you look close you can see my lines for the stringers and extra bracing, I had to ensure the backing plates did not interfere.

PXL_20240910_002455996.jpg
PXL_20240910_002505465.jpg
PXL_20240910_002509407.jpg
I got 3 coats of straight spar on all sides (6 on the edges), let it dry for a few days, then lightly sanded the spar with 120grit and used Lepage contact cement to glue down the Nautolex vinyl. The contact cement was a bit of a pain, it kept sticking to itself rather than the spar, so I ended up using all of a 500mL and most of two 946mL cans to get full coverage. To ensure I didn’t have placement issues I laid the vinyl on top of the floor in the right position, clamped a 2x4 down the center, then folded back half the vinyl over top of the 2x4. I then rolled the cement with a foam roller on both the floor and the vinyl, waited the recommended 15-20 min, then carefully flipped the vinyl back over and rolled it down to stick it firmly on. When I did the other half I ensured to fold it all the way back to the part that was already stuck down. The cement worked quite well (although expensive due to the quantity, total was almost $100) and the vinyl is firmly stuck.

Once all the vinyl was on I flipped the floor pieces over and worked on securing the edges. I applied more contact cement to the floor edges and the vinyl with about 1” overlap to the bottom, then stuck/rolled it down and used SS staples every 1-2” all the way around. I cut off the excess vinyl and the job was complete and I could recover from the hand cramps of putting in 500+ staples with a hand stapler!
PXL_20250712_164921599.jpg

And that brings us up to today! Since I installed the vinyl right over the seat mounting holes I had to locate them again so I can install the pedestal mounts once I get the bolts. I measured the backing plates on the bottom, found a good starting point on the top and then just poked with a pushpin until I found the first bolt hole. I didn’t take long after that to locate the rest, and I temporarily stuck nails through so I don’t lose them.

How did you guys deal with the bolt holes, do you have to do anything to the edges or just ream out the vinyl enough to get the bolts in?

PXL_20250712_164926857.jpg
 

Attachments

  • PXL_20250712_175556688.jpg
    PXL_20250712_175556688.jpg
    261.3 KB · Views: 0
Top