1981 Springbok 18' Restoration/Renovation

SlipperyOar

Petty Officer 2nd Class
Joined
Apr 12, 2024
Messages
129
Bought my first home, been learning how to mud and tape and crawling in an attic and crawl space to relocate some outlets and switches. Will continue the boat build once I see the damage of my mortgage payments and have some free time.
Cheers!
 

MikeSchinlaub

Petty Officer 1st Class
Joined
Jan 14, 2025
Messages
318
Ugh, I suck with drywall. Don't rely on the breakers being labled correctly, use a light pen and double check at the outlet/switch that the power is off. Have fun finding all the janky repairs from previous owners! :)
 

SlipperyOar

Petty Officer 2nd Class
Joined
Apr 12, 2024
Messages
129
Ugh, I suck with drywall. Don't rely on the breakers being labled correctly, use a light pen and double check at the outlet/switch that the power is off. Have fun finding all the janky repairs from previous owners! :)
These old houses sure didn’t follow a code when it came to electrical lol, I thought the long days of setting rivets and welding new aluminum pieces and whatnot were bad but going in an attic for hours to identify wires and sanding drywall tops that, hands down. Last bit of trim going up now before the final pieces of furniture and then I’ll be able to get back at the boat and hopefully paint it before these summertime high humidity days arrive!
 

SlipperyOar

Petty Officer 2nd Class
Joined
Apr 12, 2024
Messages
129
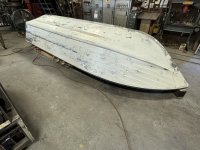
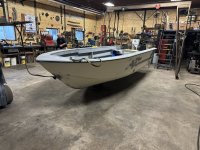
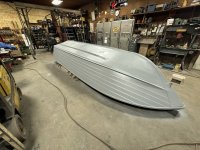
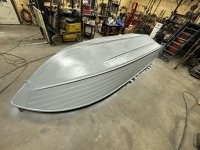
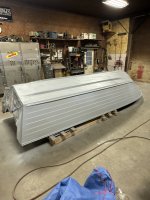
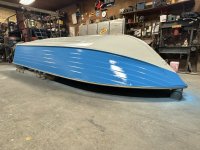
Finally back at it, brought the boat down to the shop today and got it hooked up with the A frame and forklift, lifted it off the trailer and got that out of the way, then slowly raised the one chain fall while lowering the other to get it rotated 90°. Had to really guide it past halfway but once it started it was fairly easy and did the reverse with the chain falls. Got it set up on some wood in a comfortable position to sand the existing paint. I first gave it a wash with only water to rinse any dirt off, then I sprayed degreaser on it and using a brush I scrubbed a lot of other grease and grime off, with another rinse and then let it air dry for a few hours. Began feathering out all the chipped paint spots first, wasn’t too difficult with the different tools I had. Sanding near the rivets was rather tough so I used a pneumatic die grinder tool with stainless wire wheel to clean the areas around rivets. Once I get everything feathered I’m going to do a final sanding over everything and then scotch brite and then a degrease and use acetone before spraying primer.
 

Attachments

  • IMG_1492.jpeg
    5 MB · Views: 8
  • IMG_1495.jpeg
    IMG_1495.jpeg
    2.6 MB · Views: 6
  • IMG_1483.jpeg
    IMG_1483.jpeg
    3.7 MB · Views: 6

MikeSchinlaub

Petty Officer 1st Class
Joined
Jan 14, 2025
Messages
318
Good to see you back at it. Nice work space.

Just use degreaser, skip the acetone. It's a bit aggressive for automotive paint. For this, it's basically just serving as another degreaser anyway.
 

SlipperyOar

Petty Officer 2nd Class
Joined
Apr 12, 2024
Messages
129
got my primer sprayed, was difficult at first dialing in the gun to the right settings for my epoxy primer but once I found the sweet spot it was a breeze. Went on super nicely with great coverage, 1 thin coat and a second medium coat and by the time I cleaned my tools it was looking nice. Hoping tomorrow when I check things out it has cured nicely
 

Attachments

  • IMG_1509.jpeg
    IMG_1509.jpeg
    3 MB · Views: 2
  • IMG_1510.jpeg
    IMG_1510.jpeg
    3.1 MB · Views: 2

SlipperyOar

Petty Officer 2nd Class
Joined
Apr 12, 2024
Messages
129
After 2 coats of epoxy primer I used some scotch brite and scuffed the surface and then laid down a nice even coat of reduced primer as my sealer coat. Went on very nicely and was happy with the results. Heading into town tomorrow to get the compatible urethane reducer for my topcoat and hopefully can get both tones on before the wet and humid weather at the end of the week.
 

Attachments

  • IMG_1521.jpeg
    4.5 MB · Views: 1
  • IMG_1522.jpeg
    IMG_1522.jpeg
    1.4 MB · Views: 1

SlipperyOar

Petty Officer 2nd Class
Joined
Apr 12, 2024
Messages
129
Well I finally finished painting, was a struggle finding the right times between window replacement in my house and fighting the humidity and heat we’ve had, power went out from a nearby storm as I had the paint opened about to mix and then wouldn’t have any air. Got my Honolulu blue sprayed on tonight and the grey a few days ago, the epoxy primer was amazing for the bare aluminum and scuffed existing paint and really created a nice even surface for the topcoat. Lost track of how many hours I spent with scotch brite in my hands but was well worth it. Gonna let it sit and cure for the next week or so before flipping it back onto the trailer. Enjoying a nice rye and diet tonight before a busy day doing trim work around windows tomorrow.
 

Attachments

  • IMG_1561.jpeg
    IMG_1561.jpeg
    2.1 MB · Views: 5
  • IMG_1562.jpeg
    4.8 MB · Views: 5
  • IMG_1563.jpeg
    4.3 MB · Views: 3

Rasdiir

Petty Officer 2nd Class
Joined
Jul 18, 2011
Messages
169
Well I finally finished painting, was a struggle finding the right times between window replacement in my house and fighting the humidity and heat we’ve had, power went out from a nearby storm as I had the paint opened about to mix and then wouldn’t have any air. Got my Honolulu blue sprayed on tonight and the grey a few days ago, the epoxy primer was amazing for the bare aluminum and scuffed existing paint and really created a nice even surface for the topcoat. Lost track of how many hours I spent with scotch brite in my hands but was well worth it. Gonna let it sit and cure for the next week or so before flipping it back onto the trailer. Enjoying a nice rye and diet tonight before a busy day doing trim work around windows tomorrow.
Beautiful job, I love the colour!
 

SlipperyOar

Petty Officer 2nd Class
Joined
Apr 12, 2024
Messages
129
Finally got some power for the hull, found this 93' Merc 75hp for sale by the original owner who had it gone over by the outboard mechanic at the shop he worked at.
As far as i'm aware it needs a new voltage regulator but an even 130# on all 3 cylinders and runs like a top. Was impressed by how clean it looked, it was previously on a 16' Boston Whaler so i'll need to get side mount remote controls and possibly new shifter cables depending if the old ones fit or not.
Got it home over the weekend and once i have the transom top cap and corner caps made up i can paint them as well as the interior and hang the motor. 1.jpg2.jpg3.jpg4.jpg
 

SlipperyOar

Petty Officer 2nd Class
Joined
Apr 12, 2024
Messages
129
Not sure if anyone follows this thread but I’ve been looking for some answers in mounting the 15 gallon aluminum fuel tank that came with the hull. I don’t have any pictures of it but originally it was between the stringers and held down with some metal strapping that was riveted to the stringers and I’m not sure how on earth the PO thought it was secure.

My main idea/plan was to weld aluminum angle to the front and back of the tank with bent tabs on the ends to be riveted using some 1/4” solid rivets (possibly adding 1-2 per side to also rivet the small gap to the stringers). And potentially glue some plastic strips to the bottom and rest on the ribs.

From what I can remember it fit relatively good between the stringers with a minimal gap on either side, it had a V shaped bottom to follow the contour of the hull.

I don’t plan on securing it fully into the hull until I simulate the full mass and see where the weight and balance point will be.

I know it’s a long shot post reaching for answers but everytime I try to search up the topic I end up on a fibreglass boat post
 

MikeSchinlaub

Petty Officer 1st Class
Joined
Jan 14, 2025
Messages
318
Metal strapping around the tank is pretty normal. Usually the tank will fit snugly between something side to side, and have strapping front to back. There are pieces of foam or rubber to keep the strapping off of the tank, and sometimes under the tank to cut down vibration.
 
Top